一、工具简介
Adversarial Robustness Toolbox 是 IBM 研究团队开源的用于检测模型及对抗攻击的工具箱,为开发人员加强 AI模型被误导的防御性,让 AI 系统变得更加安全,ART支持所有流行的机器学习框架 (TensorFlow,Keras,PyTorch,MXNet,scikit-learn,XGBoost,LightGBM,CatBoost,GPy等),所有数据类型 (图像,表格,音频,视频等)和机器学习任务(分类,物体检测,语音识别, 生成模型,认证等)。
支持以下攻击方法:
- Deep Fool
- Fast Gradient Method
- Jacobian Saliency Map
- Universal Perturbation
- Virtual Adversarial Method
- C&W Attack
- NewtonFool
支持以下防御方法:
- Feature squeezing
- Spatial smoothing
- Label smoothing
- Adversarial training
- Virtual adversarial training
github地址:https://github.com/Trusted-AI/adversarial-robustness-toolbox
Get Started Documentation Contributing - Installation - Examples
- Notebooks
- Attacks - Defences
- Estimators
- Metrics
- Technical Documentation
- Slack, Invitation - Contributing
- Roadmap
- Citing
二、实际应用-攻击样本生成
2.1、手写数字
攻击脚本:
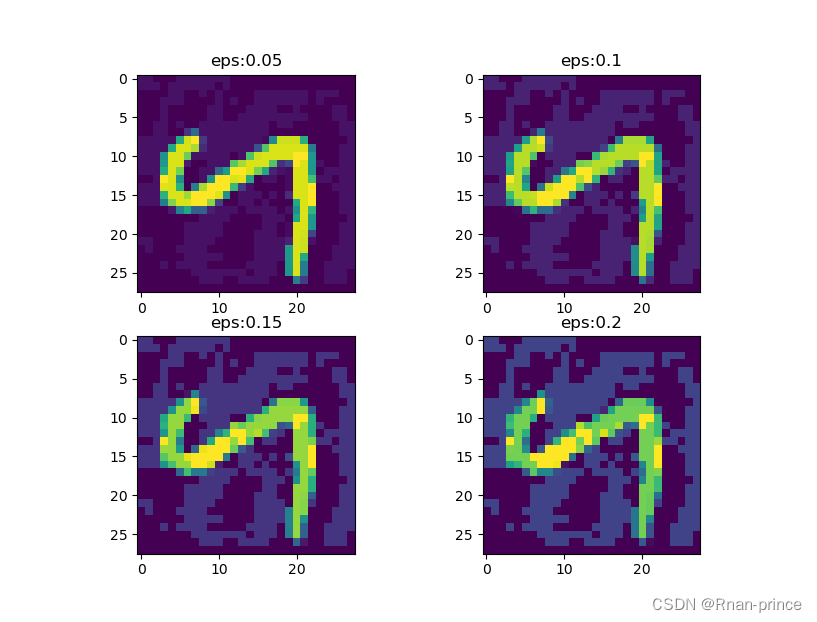
import torch.nn as nn import torch.nn.functional as F import torch.optim as optim import numpy as np import matplotlib.pyplot as plt from art.attacks.evasion import FastGradientMethod from art.estimators.classification import PyTorchClassifier from art.utils import load_mnist import warnings warnings.filterwarnings("ignore") class Net(nn.Module): """ 定义初始模型 """ def __init__(self): super(Net, self).__init__() self.conv_1 = nn.Conv2d(in_channels=1, out_channels=4, kernel_size=5, stride=1) self.conv_2 = nn.Conv2d(in_channels=4, out_channels=10, kernel_size=5, stride=1) self.fc_1 = nn.Linear(in_features=4 * 4 * 10, out_features=100) self.fc_2 = nn.Linear(in_features=100, out_features=10) def forward(self, x): x = F.relu(self.conv_1(x)) x = F.max_pool2d(x, 2, 2) x = F.relu(self.conv_2(x)) x = F.max_pool2d(x, 2, 2) x = x.view(-1, 4 * 4 * 10) x = F.relu(self.fc_1(x)) x = self.fc_2(x) return x if __name__ == '__main__': # 导入ART自带的MNIST数据集 (x_train, y_train), (x_test, y_test), min_pixel_value, max_pixel_value = load_mnist() x_train = np.swapaxes(x_train, 1, 3).astype(np.float32) x_test = np.swapaxes(x_test, 1, 3).astype(np.float32) # 创建模型 model = Net() criterion = nn.CrossEntropyLoss() optimizer = optim.Adam(model.parameters(), lr=0.01) # 创建并训练ART分类器,注意:框架内置的调用方式训练模型 classifier = PyTorchClassifier( model=model, clip_values=(min_pixel_value, max_pixel_value), loss=criterion, optimizer=optimizer, input_shape=(1, 28, 28), nb_classes=10, ) # 演示代码用训练集的前6000条样本训练模型 classifier.fit(x_train[:6000], y_train[:6000], batch_size=128, nb_epochs=2) predictions = classifier.predict(x_test) accuracy = np.sum(np.argmax(predictions, axis=1) == np.argmax(y_test, axis=1)) / len(y_test) print("在原始测试集上的准确率为: {}%".format(accuracy * 100)) # 用FGSM算法对测试集生成对抗样本并测试分类器对对抗样本的评估效果 n = 1 for e in range(5, 25, 5): print('-' * 88) eps = round(e / 100, 2) attack = FastGradientMethod(estimator=classifier, eps=eps) x_test_adv = attack.generate(x=x_test[:1000]) predictions = classifier.predict(x_test_adv) accuracy = np.sum(np.argmax(predictions, axis=1) == np.argmax(y_test[:1000], axis=1)) / len(y_test[:1000]) print(f"扰动eps={eps}时分类器的准确率为: {round(accuracy, 4) * 100}%") adv_data = np.squeeze(x_test_adv) plt.subplot(2, 2, n) plt.title(f'eps:{eps}') plt.imshow(adv_data[1]) print("分类器将其分为:", np.argmax(classifier.predict(x_test_adv[1:2]), axis=1)[0]) n += 1 plt.show()运行结果:
在原始测试集上的准确率为: 93.73%
----------------------------------------------------------------------------------------
扰动eps=0.05时分类器的准确率为: 81.6%
分类器将其分为: 2
----------------------------------------------------------------------------------------
扰动eps=0.1时分类器的准确率为: 57.8%
分类器将其分为: 2
----------------------------------------------------------------------------------------
扰动eps=0.15时分类器的准确率为: 34.5%
分类器将其分为: 2
----------------------------------------------------------------------------------------
扰动eps=0.2时分类器的准确率为: 16.400000000000002%
分类器将其分为: 0
分析结果:
根据以上结果,随着eps的增大,分类器的准确率在下降,当准确下降至16.4%时,分类器将‘2’预测为‘0’。
2.2、交通信号
见:FGSM方法生成交通信号牌的对抗图像样本-CSDN博客
参考:
Adversarial Robustness Toolbox首页、文档和下载 - 检测模型及对抗攻击的工具箱 - OSCHINA - 中文开源技术交流社区
notebook
https://www.cnblogs.com/bonelee/p/16399758.html