一、自动语音识别(ASR)和Speech是什么?
小爱同学、 Siri 、豆包的电话功能、微信的”文字语音转文字”,百度网盘的AI字幕,小度智能音箱、小米SU7等智能汽车的语音控制的功能都用到自动语音识别ASR,相当于AI字幕师和AI朗读师的一种人工智能技术。
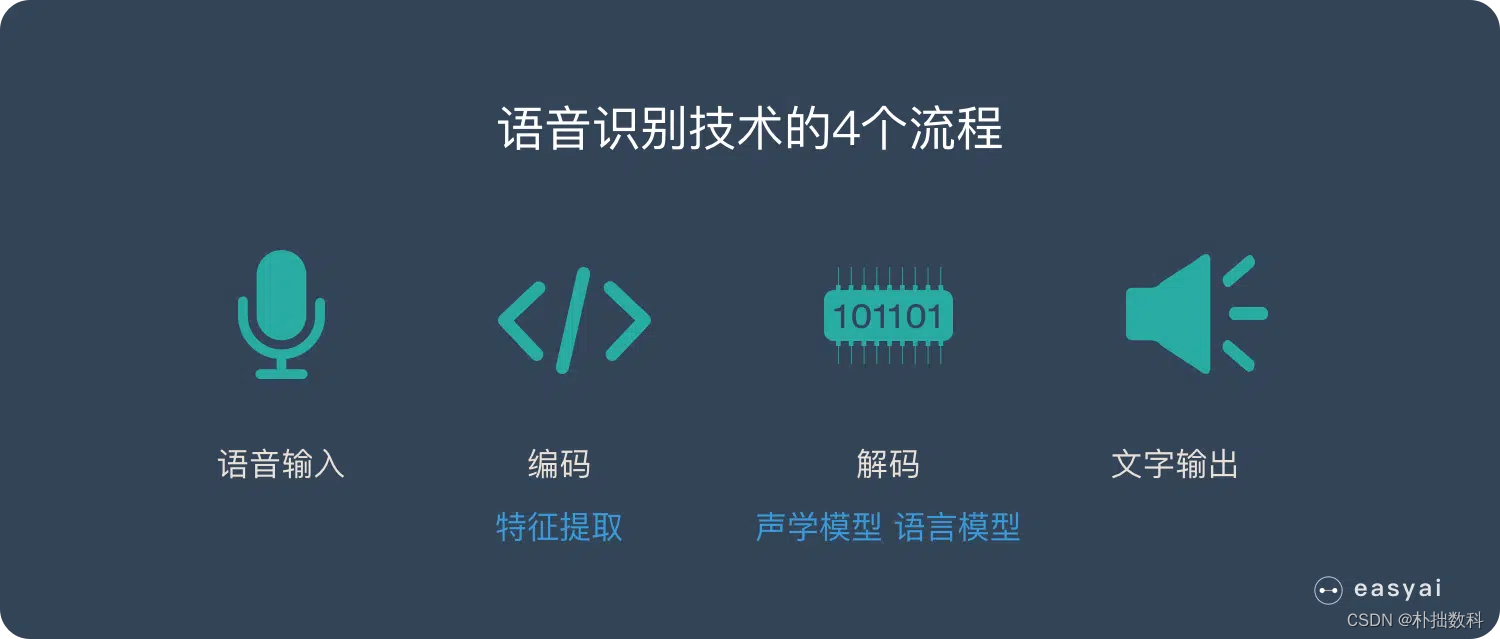
语音识别技术拆分下来,主要可分为“输入——编码——解码——输出 ”4个流程。
ASR的对声音信号的数据处理步骤:
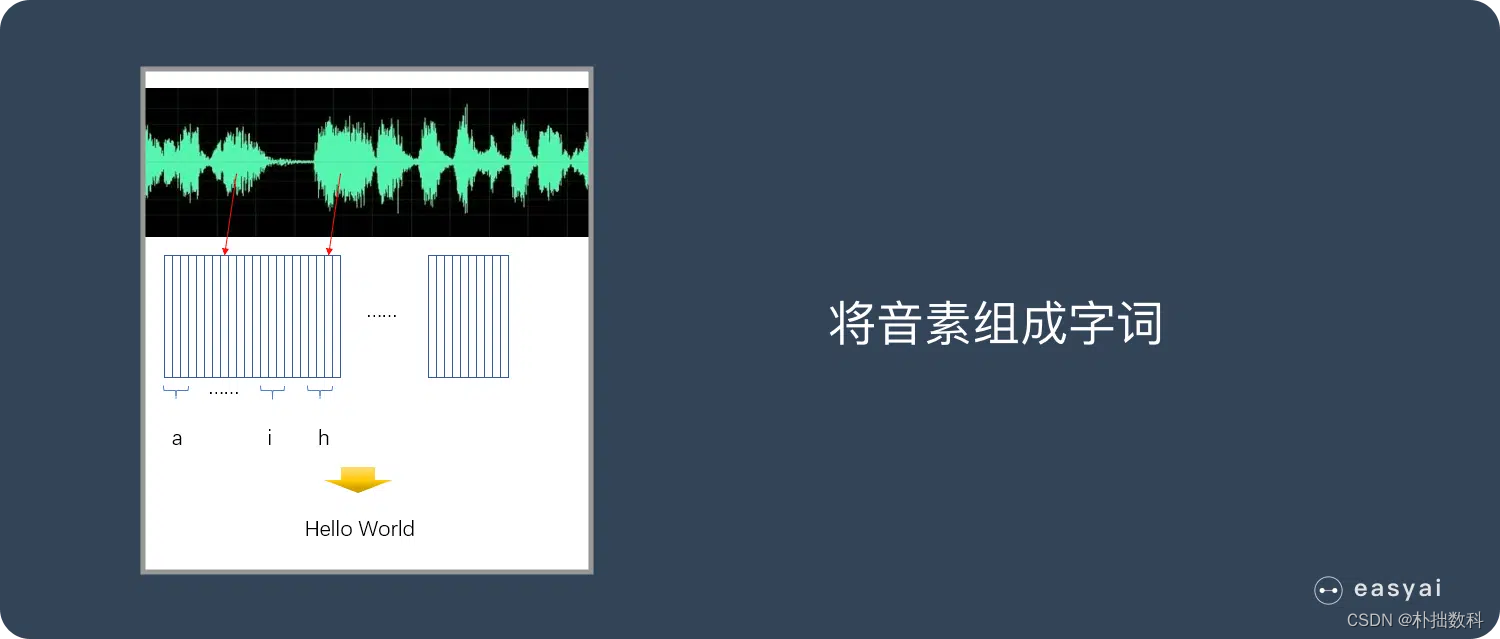
首先声音是一段段波形来表示的音频。
给音频进行信号处理后,便要按帧(毫秒级)拆分,并对拆分出的小段波形按照人耳特征变成多维向量信息
将这些帧信息识别成状态(可以理解为中间过程,一种比音素还要小的过程)
再将状态组合形成音素(通常3个状态=1个音素)
最后将音素组成字词(dà jiā hǎo)并串连成句 。于是,这就可以实现由语音转换成文字了。
ASR对声音信号有哪些特征提取方法?
语音特征提取是从原始语音信号中提取有助于语音处理和识别任务的关键信息的过程。以下是一些常用的语音特征提取方法:
-
梅尔频率倒谱系数 (MFCCs):
- MFCCs 是目前最流行的语音特征之一,它们模拟了人类耳蜗对声音的处理方式。通过将傅里叶变换后的能量谱映射到梅尔频率尺度上,然后进行对数操作和离散余弦变换得到。
-
梅尔频谱能量特征 (MFBs):
- MFBs 是从梅尔频率滤波器组的能量中得到的,它们提供了声音的频谱包络信息。
-
傅里叶变换 (FT):
- FT 是将时域信号转换到频域的基本工具,可以揭示信号的频率成分。
-
短时傅里叶变换 (STFT):
- STFT 允许我们查看信号在不同时间的频率成分,通常用于非平稳信号的分析。
-
倒谱变换:
- 倒谱变换是将傅里叶变换的幅度取对数后再进行傅里叶逆变换,用于减少噪声和增强语音信号的特征。
-
过零率 (ZCR):
- ZCR 是指信号在一帧内通过零点的次数,与信号的周期性和音高有关。
-
谱能量特征:
- 计算每一帧的功率谱密度,反映了信号的频率分布。
-
色谱图 (Chromagram):
- 色谱图通过将STFT的幅度映射到对数频率尺度上,用于表示声音的音色。
-
基频 (F0):
这些特征可以通过不同的算法和工具提取,如librosa库在Python中就提供了许多用于语音分析和特征提取的函数。在自动语音识别系统中,这些特征被用来训练模型,以识别和理解不同的语音指令或话语。
一个计算梅尔频率倒谱系数MFCCs的示例代码:
下面是一个使用Python和librosa库来提取MFCCs特征的简单示例。这个示例将演示如何加载一个音频文件,计算其STFT,然后使用STFT结果来计算MFCCs。
首先,确保已经安装了librosa和soundfile库。如果没有安装,可以使用以下命令安装:
pip install librosa soundfile
以下是提取MFCCs的Python代码示例:
import librosa
import soundfile as sf
import numpy as np
import matplotlib.pyplot as plt
# 加载音频文件
audio_path = 'your_audio_file.wav'  # 替换为你的音频文件路径
y, sr = librosa.load(audio_path, sr=None)  # y是音频波形,sr是采样率
# 计算STFT
n_fft = 2048  # FFT的大小
hop_length = 512  # 帧移
stft = librosa.stft(y, n_fft=n_fft, hop_length=hop_length)
# 将STFT的幅度转换为分贝单位
amplitude = librosa.amplitude_to_db(np.abs(stft))
# 计算MFCCs
n_mfcc = 13  # 想要的MFCC数量
mfcc = librosa.feature.mfcc(y=amplitude, sr=sr, n_mfcc=n_mfcc, hop_length=hop_length)
# 可视化MFCCs
plt.figure(figsize=(10, 4))
librosa.display.waveplot(y, sr=sr)
plt.title('Audio Waveform')
plt.figure(figsize=(10, 4))
librosa.display.specshow(mfcc, x_axis='time')
plt.colorbar()
plt.title('MFCC')
plt.show()
在这个示例中,我们首先使用librosa.load加载音频文件,然后使用librosa.stft计算短时傅里叶变换。接下来,我们使用librosa.amplitude_to_db将STFT的幅度转换为分贝单位,这是计算MFCCs的常见做法。最后,我们使用librosa.feature.mfcc函数计算MFCCs,并使用matplotlib库来可视化原始波形和MFCCs。请注意,这个示例只演示了如何计算和可视化MFCCs。其他特征的计算方法可能会有所不同,但librosa库同样提供了相应的函数来计算这些特征。
Speech是什么?
Speech在自动语音识别(ASR — Automatic Speech Recognition)的上下文中,它指的是人们说话的声音,该声音被ASR系统捕捉并转换成文本。此外,“Speech” 也可以指代关于语音的各种技术、研究领域或相关服务。比如可以基于微软云平台和大数据云计算,从事语音识别声学模型、语言模型的训练和迭代优化方面的开发,与语音识别模型建模相关的自动化工具和系统的开发,以及语音识别前沿技术研究实验类工作。
二、如何进行自动语音识别ASR 模型训练?
自动语音识别(ASR)模型的训练是一个复杂的过程,涉及多个步骤。以下是一个简化的流程,展示如何使用Python和一些流行的库来训练一个基本的ASR模型:
-
数据收集与预处理:
- 收集大量标注好的语音数据。数据需要涵盖不同的说话者、口音、背景噪音等。
- 对音频数据进行预处理,如去噪、分割、静音删除等。
-
特征提取:
- 使用librosa等库提取语音特征,如MFCC。
-
数据集划分:
- 将数据集分为训练集、验证集和测试集。
-
模型设计:
- 设计ASR模型的架构,可以是基于深度学习的模型,如循环神经网络(RNN)、长短时记忆网络(LSTM)或Transformer。
-
模型训练:
- 使用训练集数据训练模型,同时用验证集进行超参数调整。
-
模型评估:
- 在测试集上评估模型性能,使用词错误率(WER)等指标。
-
模型优化:
- 根据评估结果对模型进行优化,如添加正则化、改变网络结构等。
-
模型部署:
- 将训练好的模型部署到实际应用中。
以下是使用Python和TensorFlow/Keras库训练ASR模型的一个示例流程:
import tensorflow as tf
from tensorflow.keras import layers, models
import librosa
from sklearn.model_selection import train_test_split
# 假设X是特征集,y是对应的文本标签
# 特征和标签
X = ...  # 特征集,如MFCC
y = ...  # 对应的文本标签
# 划分数据集
X_train, X_test, y_train, y_test = train_test_split(X, y, test_size=0.2)
# 构建模型
model = models.Sequential()
model.add(layers.InputLayer(input_shape=(None, X.shape[2])))  # 假设X是3维的
model.add(layers.LSTM(128, return_sequences=True))
model.add(layers.LSTM(128))
model.add(layers.Dense(y.shape[1], activation='softmax'))  # 输出层
# 编译模型
model.compile(optimizer='adam', loss='sparse_categorical_crossentropy', metrics=['accuracy'])
# 训练模型
model.fit(X_train, y_train, validation_data=(X_test, y_test), epochs=10)
# 评估模型
test_loss, test_acc = model.evaluate(X_test, y_test, verbose=2)
print(f'Test accuracy: {test_acc}')
这个示例展示了如何使用Keras构建一个简单的LSTM模型,并在数据集上进行训练和评估。在实际应用中,你需要根据具体的数据集和任务需求设计更复杂的模型,并进行细致的调参。
请注意,这只是一个示例流程,实际的ASR模型训练会更加复杂,可能包括数据增强、端到端训练、注意力机制、解码器等高级技术。此外,还需要对数据进行预处理和特征提取,并且可能需要使用更复杂的网络结构和训练策略。
更好的方法是用成熟的框架实现,如微软Azure AI服务中的Speech Studio。
三、什么是Speech Studio?
Speech Studio是微软Azure AI服务中的一个工具,它提供基于用户界面的工具,用于在应用程序中生成和集成Azure AI语音服务的功能。
用户可以在Speech Studio中试用语音转文本和文本转语音的功能,而无需注册或编写任何代码。
Speech Studio允许用户浏览、试用和查看一些常见用例的示例代码。
# Notes:
# - Install the Speech SDK. Run:
# pip install azure-cognitiveservices-speech
from datetime import datetime, time, timezone
from itertools import groupby, pairwise
from os import linesep, remove
from os.path import exists
from pathlib import Path
from sys import argv
from time import sleep
from typing import Any, List, Optional
import wave
import azure.cognitiveservices.speech as speechsdk # type: ignore
import caption_helper
import helper
import user_config_helper
class Captioning(object) :
    def __init__(self) :
        self._user_config = user_config_helper.user_config_from_args(USAGE)
        self._srt_sequence_number = 1
        self._previous_caption : Optional[caption_helper.Caption] = None
        self._previous_end_time : Optional[time] = None
        self._previous_result_is_recognized = False
        self._recognized_lines : List[str] = []
        self._offline_results : List[speechsdk.SpeechRecognitionResult] = []
    def get_timestamp(self, start : time, end : time) -> str :
        time_format = ""
        if self._user_config["use_sub_rip_text_caption_format"] :
            # SRT format requires ',' as decimal separator rather than '.'.
            time_format = "%H:%M:%S,%f"
        else :
            time_format = "%H:%M:%S.%f"
        # Truncate microseconds to milliseconds.
        return "{} --> {}".format(start.strftime(time_format)[:-3], end.strftime(time_format)[:-3])
    def string_from_caption(self, caption : caption_helper.Caption) -> str :
        retval = ""
        if self._user_config["use_sub_rip_text_caption_format"] :
            retval += str(caption.sequence) + linesep
        retval += self.get_timestamp(caption.begin, caption.end) + linesep
        retval += caption.text + linesep + linesep
        return retval
    def adjust_real_time_caption_text(self, text : str, is_recognized_result : bool) -> str :
        # Split the caption text into multiple lines based on max_line_length and lines.
        temp_caption_helper = caption_helper.CaptionHelper(self._user_config["language"], self._user_config["max_line_length"], self._user_config["lines"], [])
        lines = temp_caption_helper.lines_from_text(text)
        # Recognizing results can change with each new result, so we do not save previous Recognizing results.
        # Recognized results are final, so we save them in a member value.
        recognizing_lines : List[str] = []
        if is_recognized_result :
            self._recognized_lines = self._recognized_lines + lines
        else :
            recognizing_lines = lines

        caption_lines = self._recognized_lines + recognizing_lines
        return '\n'.join(caption_lines[-self._user_config["lines"]:])
    def caption_from_real_time_result(self, result : speechsdk.SpeechRecognitionResult, is_recognized_result : bool) -> Optional[str] :
        retval : Optional[str] = None
        start_time = helper.time_from_ticks(result.offset)
        end_time = helper.time_from_ticks(result.offset + result.duration)

        # If the end timestamp for the previous result is later
        # than the end timestamp for this result, drop the result.
        # This sometimes happens when we receive a lot of Recognizing results close together.
        if self._previous_end_time is not None and self._previous_end_time > end_time :
            pass
        else :
            # Record the end timestamp for this result.
            self._previous_end_time = end_time

            # Convert the SpeechRecognitionResult to a caption.
            # We are not ready to set the text for this caption.
            # First we need to determine whether to clear _recognizedLines.
            caption = caption_helper.Caption(self._user_config["language"], self._srt_sequence_number, helper.add_time_and_timedelta(start_time, self._user_config["delay"]), helper.add_time_and_timedelta(end_time, self._user_config["delay"]), "")
            # Increment the sequence number.
            self._srt_sequence_number += 1
            # If we have a previous caption...
            if self._previous_caption is not None :
                # If the previous result was type Recognized...
                if self._previous_result_is_recognized :
                    # Set the end timestamp for the previous caption to the earliest of:
                    # - The end timestamp for the previous caption plus the remain time.
                    # - The start timestamp for the current caption.
                    previous_end = helper.add_time_and_timedelta(self._previous_caption.end, self._user_config["remain_time"])
                    self._previous_caption.end = previous_end if previous_end  List[caption_helper.Caption] :
        captions = caption_helper.get_captions(self._user_config["language"], self._user_config["max_line_length"], self._user_config["lines"], list(self._offline_results))
        # Save the last caption.
        last_caption = captions[-1]
        last_caption.end = helper.add_time_and_timedelta(last_caption.end, self._user_config["remain_time"])
        # In offline mode, all captions come from RecognitionResults of type Recognized.
        # Set the end timestamp for each caption to the earliest of:
        # - The end timestamp for this caption plus the remain time.
        # - The start timestamp for the next caption.
        captions_2 : List[caption_helper.Caption] = []
        for (caption_1, caption_2) in pairwise(captions) :
            end = helper.add_time_and_timedelta(caption_1.end, self._user_config["remain_time"])
            caption_1.end = end if end  None :
        if user_config_helper.CaptioningMode.OFFLINE == self._user_config["captioning_mode"] :
            for caption in self.captions_from_offline_results() :
                helper.write_to_console_or_file(text=self.string_from_caption(caption), user_config=self._user_config)
        elif user_config_helper.CaptioningMode.REALTIME == self._user_config["captioning_mode"] :
            # Show the last "previous" caption, which is actually the last caption.
            if self._previous_caption is not None :
                self._previous_caption.end = helper.add_time_and_timedelta(self._previous_caption.end, self._user_config["remain_time"])
                helper.write_to_console_or_file(text=self.string_from_caption(self._previous_caption), user_config=self._user_config)
    def initialize(self) :
        if self._user_config["output_file"] is not None and exists(self._user_config["output_file"]) :
            remove(self._user_config["output_file"])
        if not self._user_config["use_sub_rip_text_caption_format"] :
            helper.write_to_console_or_file(text="WEBVTT{}{}".format(linesep, linesep), user_config=self._user_config)
        return
    def audio_config_from_user_config(self) -> helper.Read_Only_Dict :
        if self._user_config["input_file"] is None :
            return helper.Read_Only_Dict({
                "audio_config" : speechsdk.AudioConfig(use_default_microphone=True),
                "audio_stream_format" : None,
                "pull_input_audio_stream_callback" : None,
                "pull_input_audio_stream" : None
            })
        else :
            audio_stream_format = None
            if not self._user_config["use_compressed_audio"] :
                reader = wave.open(self._user_config["input_file"], mode=None)
                audio_stream_format = speechsdk.audio.AudioStreamFormat(samples_per_second=reader.getframerate(), bits_per_sample=reader.getsampwidth() * 8, channels=reader.getnchannels())
                reader.close()
            else :
                audio_stream_format = speechsdk.audio.AudioStreamFormat(compressed_stream_format=self._user_config["compressed_audio_format"])
            callback = helper.BinaryFileReaderCallback(filename=self._user_config["input_file"])
            stream = speechsdk.audio.PullAudioInputStream(pull_stream_callback=callback, stream_format=audio_stream_format)
            # We return the BinaryFileReaderCallback, AudioStreamFormat, and PullAudioInputStream
            # because we need to keep them in scope until they are actually used.
            return helper.Read_Only_Dict({
                "audio_config" : speechsdk.audio.AudioConfig(stream=stream),
                "audio_stream_format" : audio_stream_format,
                "pull_input_audio_stream_callback" : callback,
                "pull_input_audio_stream" : stream,
            })
    def speech_config_from_user_config(self) -> speechsdk.SpeechConfig :
        speech_config = None
        speech_config = speechsdk.SpeechConfig(subscription=self._user_config["subscription_key"], region=self._user_config["region"])
        speech_config.set_profanity(self._user_config["profanity_option"])
        if self._user_config["stable_partial_result_threshold"] is not None :
            speech_config.set_property(property_id=speechsdk.PropertyId.SpeechServiceResponse_StablePartialResultThreshold, value=self._user_config["stable_partial_result_threshold"])
        speech_config.set_property(property_id=speechsdk.PropertyId.SpeechServiceResponse_PostProcessingOption, value="TrueText")
        speech_config.speech_recognition_language=self._user_config["language"]

        return speech_config
    def speech_recognizer_from_user_config(self) -> helper.Read_Only_Dict :
        audio_config_data = self.audio_config_from_user_config()
        speech_config = self.speech_config_from_user_config()
        speech_recognizer = speechsdk.SpeechRecognizer(speech_config=speech_config, audio_config=audio_config_data["audio_config"])
        if len(self._user_config["phrases"]) > 0 :
            grammar = speechsdk.PhraseListGrammar.from_recognizer(recognizer=speech_recognizer)
            for phrase in self._user_config["phrases"] :
                grammar.addPhrase(phrase)
        return helper.Read_Only_Dict({
            "speech_recognizer" : speech_recognizer,
            "audio_stream_format" : audio_config_data["audio_stream_format"],
            "pull_input_audio_stream_callback" : audio_config_data["pull_input_audio_stream_callback"],
            "pull_input_audio_stream" : audio_config_data["pull_input_audio_stream"],
        })
    def recognize_continuous(self, speech_recognizer : speechsdk.SpeechRecognizer, format : speechsdk.audio.AudioStreamFormat, callback : helper.BinaryFileReaderCallback, stream : speechsdk.audio.PullAudioInputStream) :
        done = False
        def recognizing_handler(e : speechsdk.SpeechRecognitionEventArgs) :
            if speechsdk.ResultReason.RecognizingSpeech == e.result.reason and len(e.result.text) > 0 :
                # This seems to be the only way we can get information about
                # exceptions raised inside an event handler.
                try :
                    caption = self.caption_from_real_time_result(e.result, False)
                    if caption is not None :
                        helper.write_to_console_or_file(text=caption, user_config=self._user_config)
                except Exception as ex :
                    print('Exception in recognizing_handler: {}'.format(ex))
            elif speechsdk.ResultReason.NoMatch == e.result.reason :
                helper.write_to_console(text="NOMATCH: Speech could not be recognized.{}".format(linesep), user_config=self._user_config)
        def recognized_handler(e : speechsdk.SpeechRecognitionEventArgs) :
            if speechsdk.ResultReason.RecognizedSpeech == e.result.reason and len(e.result.text) > 0 :
                try :
                    if user_config_helper.CaptioningMode.OFFLINE == self._user_config["captioning_mode"] :
                        self._offline_results.append(e.result)
                    else :
                        caption = self.caption_from_real_time_result(e.result, True)
                        if caption is not None :
                            helper.write_to_console_or_file(text=caption, user_config=self._user_config)
                except Exception as ex :
                    print('Exception in recognized_handler: {}'.format(ex))
            elif speechsdk.ResultReason.NoMatch == e.result.reason :
                helper.write_to_console(text="NOMATCH: Speech could not be recognized.{}".format(linesep), user_config=self._user_config)
        def canceled_handler(e : speechsdk.SpeechRecognitionCanceledEventArgs) :
            nonlocal done
            # Notes:
            # SpeechRecognitionCanceledEventArgs inherits the result property from SpeechRecognitionEventArgs. See:
            # https://docs.microsoft.com/python/api/azure-cognitiveservices-speech/azure.cognitiveservices.speech.speechrecognitioncanceledeventargs
            # https://docs.microsoft.com/python/api/azure-cognitiveservices-speech/azure.cognitiveservices.speech.speechrecognitioneventargs
            # result is type SpeechRecognitionResult, which inherits the reason property from RecognitionResult. See:
            # https://docs.microsoft.com/python/api/azure-cognitiveservices-speech/azure.cognitiveservices.speech.speechrecognitionresult
            # https://docs.microsoft.com/python/api/azure-cognitiveservices-speech/azure.cognitiveservices.speech.recognitionresult
            # e.result.reason is ResultReason.Canceled. To get the cancellation reason, see e.cancellation_details.reason.
            if speechsdk.CancellationReason.EndOfStream == e.cancellation_details.reason :
                helper.write_to_console(text="End of stream reached.{}".format(linesep), user_config=self._user_config)
                done = True
            elif speechsdk.CancellationReason.CancelledByUser == e.cancellation_details.reason :
                helper.write_to_console(text="User canceled request.{}".format(linesep), user_config=self._user_config)
                done = True
            elif speechsdk.CancellationReason.Error == e.cancellation_details.reason :
                # Error output should not be suppressed, even if suppress output flag is set.
                print("Encountered error. Cancellation details: {}{}".format(e.cancellation_details, linesep))
                done = True
            else :
                print("Request was cancelled for an unrecognized reason. Cancellation details: {}{}".format(e.cancellation_details, linesep))
                done = True
        def stopped_handler(e : speechsdk.SessionEventArgs) :
            nonlocal done
            helper.write_to_console(text="Session stopped.{}".format(linesep), user_config=self._user_config)
            done = True
        # We only use Recognizing results in real-time mode.
        if user_config_helper.CaptioningMode.REALTIME == self._user_config["captioning_mode"] :
            speech_recognizer.recognizing.connect(recognizing_handler)
        speech_recognizer.recognized.connect(recognized_handler)
        speech_recognizer.session_stopped.connect(stopped_handler)
        speech_recognizer.canceled.connect(canceled_handler)
        speech_recognizer.start_continuous_recognition()
        while not done :
            sleep(5)
        speech_recognizer.stop_continuous_recognition()
        return
if user_config_helper.cmd_option_exists("--help") :
    print(USAGE)
else :
    captioning = Captioning()
    captioning.initialize()
    speech_recognizer_data = captioning.speech_recognizer_from_user_config()
    captioning.recognize_continuous(speech_recognizer=speech_recognizer_data["speech_recognizer"], format=speech_recognizer_data["audio_stream_format"], callback=speech_recognizer_data["pull_input_audio_stream_callback"], stream=speech_recognizer_data["pull_input_audio_stream"])
    captioning.finish()
Speech Studio有什么功能?
-
Speech Studio功能:
- 自然发音的应用和服务:Speech Studio可以帮助开发者生成自然发音的应用和服务,通过自定义AI语音生成器,声音独具特色且很自然。
- 逼真的合成语音:提供与人类语音相匹配的流畅、自然发音的文本转语音功能。
- 可自定义文本讲述者语音:创建反映品牌标识的独特AI语音生成器。
- 精细文本转语音音频控制:用户可以轻松调整语速、音调、发音和停顿等,优化语音输出。
- 灵活部署:支持在云中、本地或容器边缘运行文本转语音。
- 定制语音输出:允许微调合成的语音音频以适应特定方案。
-
Speech Studio的无代码方法:
- 用户可以在Speech Studio中通过无代码方法创建项目,然后通过语音SDK、语音CLI或REST API在应用程序中引用。
-
发音评估工具:
- Speech Studio中包含的发音评估工具使用语音转文本功能为语言学习者提供主观和客观的反馈,有助于提高语言技能。
-
语音合成技术的历史:
企业云原生成熟高效的流水线解决方案是Azure ppl流水线在微软Azure云端实现OpenPPL。
四、如何用Azure ppl流水线在微软Azure云端实现OpenPPL?
OpenPPL是一个高性能、多后端、自主可控的云上推理解决方案,支持OpenMMLab的高效部署。它是一个基于自研高性能算子库的推理引擎,适用于AI模型的多后端部署,特别是在云原生环境下。OpenPPL旨在让人工智能应用高效可靠地运行在现有的计算平台上,为云端场景提供人工智能推理服务。
这可能指的是Azure DevOps中的持续集成/持续部署(CI/CD)流水线,它用于自动化软件交付过程。自动化流水线可以确保快速、频繁的部署和更高的产品质量,减少人为错误并支持快速的发布节奏。
Azure Pipelines 是微软 Azure DevOps 服务中的一个持续集成和持续部署(CI/CD)工具,它允许用户自动化构建、测试和部署软件的流程。OpenPPL 是一个高性能的深度学习推理引擎,专注于在各种计算平台上部署 AI 模型,特别是在云端环境中。
要在云端实现 OpenPPL 与 Azure Pipelines 的集成,你可以考虑以下步骤:
在微软Azure云端使用Azure DevOps的Azure Pipelines(简称Azure CI/CD或Azure PPL流水线)实现OpenPPL的步骤可以概括如下:
在微软Azure云端利用Azure DevOps的Azure Pipelines实现OpenPPL的步骤整合如下:
-
创建Azure DevOps项目:
- 登录Azure DevOps平台,创建一个新的项目以托管OpenPPL的代码和定义CI/CD流水线。
-
配置源代码管理:
- 将OpenPPL的源代码添加到Azure DevOps支持的版本控制系统中,如Git,确保代码可以被流水线访问。
-
创建Azure Pipeline:
- 在项目中创建一个新的Azure Pipeline,这将定义自动构建、测试和部署OpenPPL的流程。
-
定义构建和测试步骤:
- 编写YAML文件来定义流水线中的构建流程,包括编译OpenPPL引擎和所有必要的依赖项。
- 添加测试步骤,确保编译后的OpenPPL满足既定的性能和功能标准。
-
部署到云服务:
- 配置部署步骤,以便将构建并通过测试的OpenPPL引擎部署到Azure云服务,如Azure Kubernetes Service (AKS)、Azure VMs或Azure Batch。
-
集成OpenMMLab模型:
- 如果项目需求包括使用OpenMMLab提供的模型,确保它们可以在OpenPPL引擎上有效运行。
-
利用Azure AI服务:
- 根据项目需求集成Azure AI服务,如Azure Machine Learning或Azure Cognitive Services,以增强OpenPPL的功能和性能。
-
- 配置Azure Monitor和Azure Log Analytics来监控OpenPPL部署的状态和性能,确保服务的可靠性。
-
安全性和合规性:
- 遵循Azure安全最佳实践,使用Azure Key Vault等工具安全地管理敏感信息,确保部署的安全性。
-
自动化部署流程:
通过以上步骤,可以在微软Azure云平台上实现OpenPPL的自动化构建、测试和部署,利用Azure DevOps提供的CI/CD能力来提高开发效率和系统的可靠性。从而为云端提供高效的 AI 推理服务。具体的实现细节可能会根据你的具体需求和环境配置有所不同。
请注意,这个过程需要一定的云计算和DevOps知识,以及对 Azure 平台和 OpenPPL 引擎的理解。如果你需要更详细的操作指导,建议查阅 Azure DevOps 和 OpenPPL 的官方文档,或者咨询相关领域的专家。