[嵌入式AI从0开始到入土]嵌入式AI系列教程
注:等我摸完鱼再把链接补上
可以关注我的B站号工具人呵呵的个人空间,后期会考虑出视频教程,务必催更,以防我变身鸽王。
第1期 昇腾Altas 200 DK上手
第2期 下载昇腾案例并运行
第3期 官方模型适配工具使用
第4期 炼丹炉的搭建(基于Ubuntu23.04 Desktop)
第5期 炼丹炉的搭建(基于wsl2_Ubuntu22.04)
第6期 Ubuntu远程桌面配置
第7期 下载yolo源码及样例运行验证
第8期 在线Gpu环境训练(基于启智ai协作平台)
第9期 转化为昇腾支持的om离线模型
第10期 jupyter lab的使用
第11期 yolov5在昇腾上推理
第12期 yolov5在昇腾上应用
未完待续…
文章目录
- [嵌入式AI从0开始到入土]嵌入式AI系列教程
- 前言
- 一、环境准备
- 1、确认驱动版本
- 2、CANN安装
- 3、Mindx sdk安装
- 二、新建项目
- 1、input
- 2、models
- 3、output
- 4、utils_det.py
- 5、main.py
- 三、运行
- 正常情况
- 大翻车
- 四、IDE
- 五、问题
- 1、No module named cv2
- 2、No module named mindx
- 3、undefined symbol: aclrtCreateStreamWithConfig
- 4、AttributeError: 'NoneType' object has no attribute ' infer '
- 5、libpython3.9.so.1.0: cannot open shared object file: No such file or directory
- 6、libxxx.so :cannot open shared object file
- 总结
前言
注:本人代码在pc机上完成编写,运行需要昇腾推理卡或者开发者套件
先说下我的环境,pc机是ubuntu23.04,CANN版本7.0.0.alpha001,mindx版本5.0.RC3。Atlas 200 DK上CANN版本5.1.RC2.alpha007,mindx版本3.0.0。务必注意版本兼容性问题
别问我为什么鸽了这么久,不信你就跳过第一节!!!
一、环境准备
1、确认驱动版本
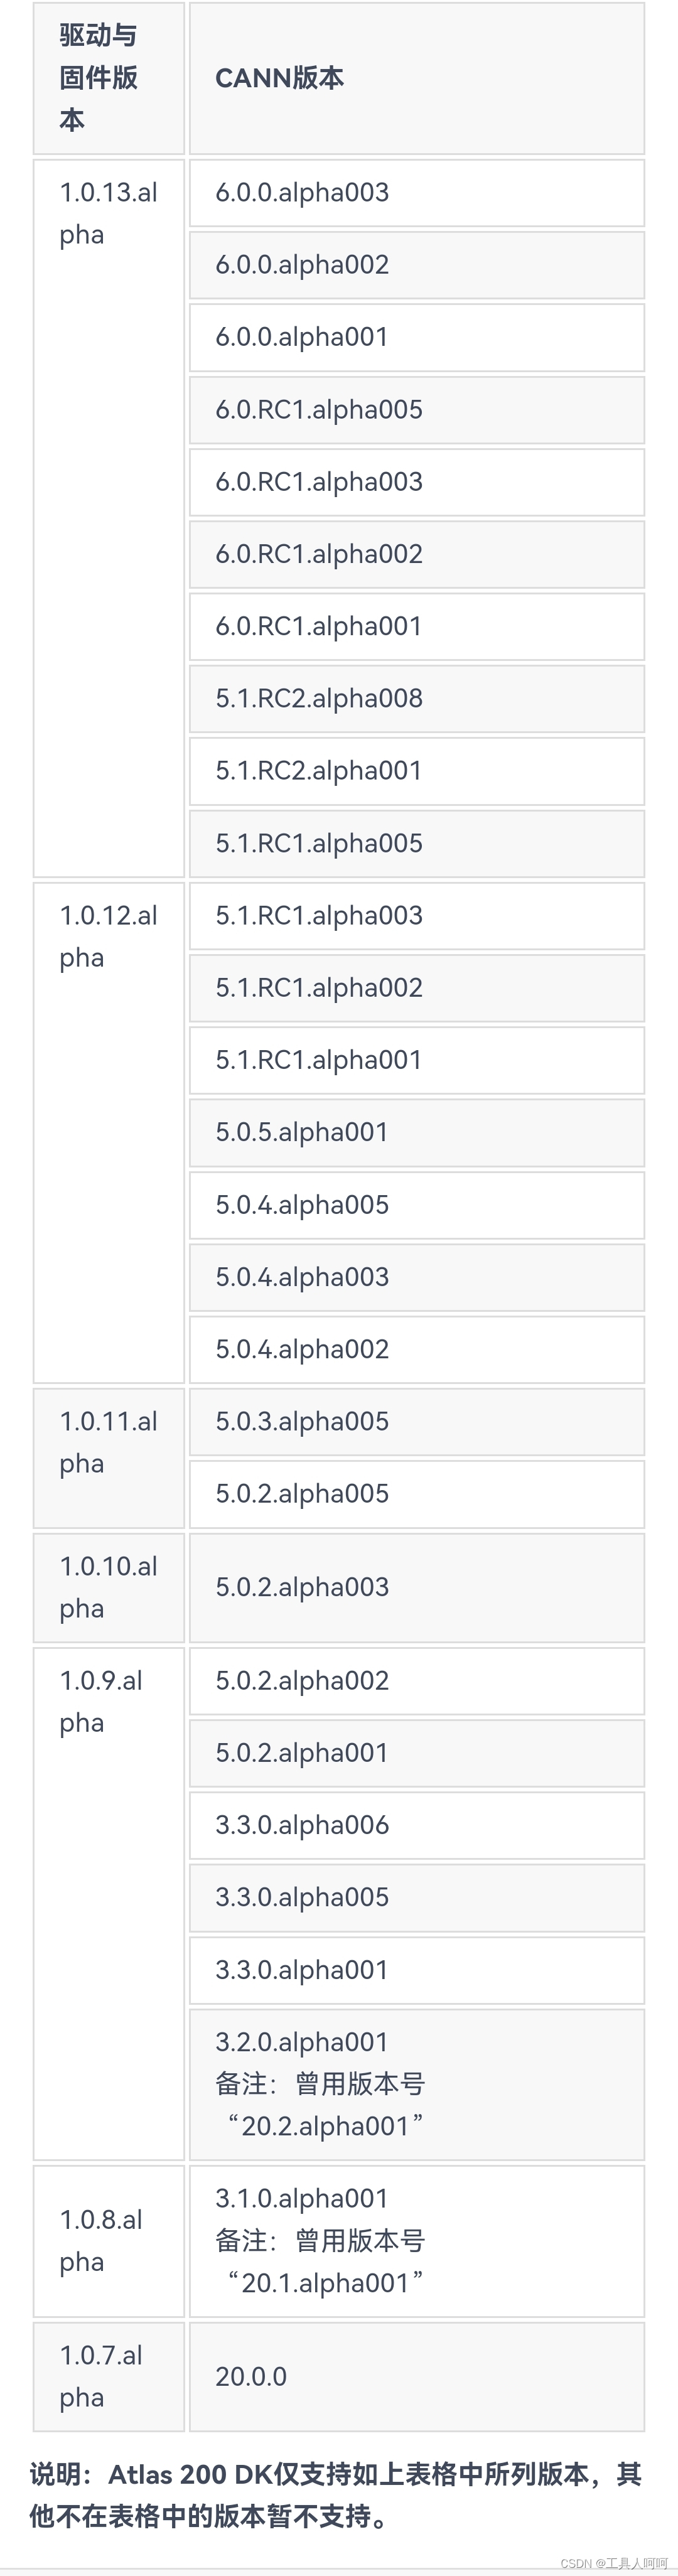
如下图所示,为200DK的驱动和CANN的对照表,需严格按照图中所写版本进行安装,否则运行报错。
关于驱动版本的查看,使用npu-smi info,version后的数字对应版本,但没找到具体对应关系。目前我只确定200DK官方制卡工具提供的镜像是最新的1.0.13.alpha的驱动,也就是version:21.0.4。
似乎200i A2需要使用CANN6.2,一般就是镜像自带的。
2、CANN安装
如果版本符合要求,直接跳过,否则需要重新安装。这个不在重复,看往期文章就可以了。下载地址点这里。社区版,记得添加硬件信息,不然找不到对应的版本。
注意一点,下载aarch64的,别下成x86_64的就行。
3、Mindx sdk安装
我们需要的是mxVision,另外两个现在暂时用不上
这里我卡了好久,后来才查到也需要安装当前CANN匹配的Mindx。具体对照表没查到,根据论坛和我个人的测试,6.2或者6.3的cann应该安装5.0的mindx,6.0.0或者5.1应该是3.0mindx。
下载地址放在这,我使用镜像自带的5.1cann和3.0.0mindx测试通过。
注意:因为安装mindx的时候会复制算子到cann的文件夹内,所以需要先装cann再装mindx,即使是升降级版本
二、新建项目
这是我的项目结构,项目也已经上传,在本文最上方的绑定资源中。没找到点这里跳转。
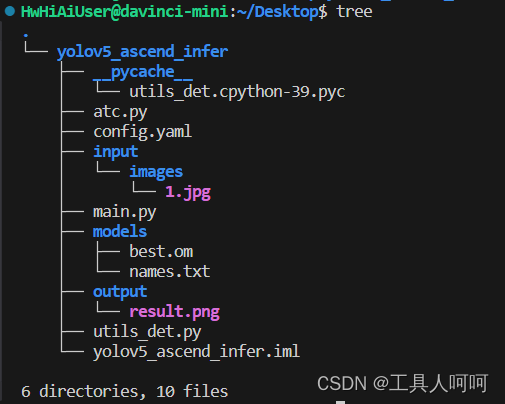
这里atc虽然在里面,但是我们已经转换了模型,所以不再解析了。
1、input
这里我使用了一个images的文件夹用来存放需要检测的图片。正常的jpg图片都可以,但是需要图中有你数据集中的类(我这用的coco128的数据集,支持的物体还是很多的)。
2、models
这里负责存放模型文件和类别名称。names.txt格式如下
person
bicycle
car
motorcycle
airplane
......
3、output
存放输出的结果
4、utils_det.py
主要是模型的前后处理函数,内容如下
import time
import cv2
import numpy as np
import torch
import torchvision
def letterbox(img, new_shape=(640, 640), color=(114, 114, 114), auto=False, scaleFill=False, scaleup=True):
    # Resize image to a 32-pixel-multiple rectangle https://github.com/ultralytics/yolov3/issues/232
    shape = img.shape[:2]  # current shape [height, width]
    if isinstance(new_shape, int):
        new_shape = (new_shape, new_shape)
    # Scale ratio (new / old)
    r = min(new_shape[0] / shape[0], new_shape[1] / shape[1])
    if not scaleup:  # only scale down, do not scale up (for better test mAP)
        r = min(r, 1.0)
    # Compute padding
    ratio = r, r  # width, height ratios
    new_unpad = int(round(shape[1] * r)), int(round(shape[0] * r))
    dw, dh = new_shape[1] - new_unpad[0], new_shape[0] - new_unpad[1]  # wh padding
    if auto:  # minimum rectangle
        dw, dh = np.mod(dw, 64), np.mod(dh, 64)  # wh padding
    elif scaleFill:  # stretch
        dw, dh = 0.0, 0.0
        new_unpad = (new_shape[1], new_shape[0])
        ratio = new_shape[1] / shape[1], new_shape[0] / shape[0]  # width, height ratios
    dw /= 2  # divide padding into 2 sides
    dh /= 2
    if shape[::-1] != new_unpad:  # resize
        img = cv2.resize(img, new_unpad, interpolation=cv2.INTER_LINEAR)
    top, bottom = int(round(dh - 0.1)), int(round(dh + 0.1))
    left, right = int(round(dw - 0.1)), int(round(dw + 0.1))
    img = cv2.copyMakeBorder(img, top, bottom, left, right, cv2.BORDER_CONSTANT, value=color)  # add border
    return img, ratio, (dw, dh)
def non_max_suppression(
        prediction,
        conf_thres=0.25,
        iou_thres=0.45,
        classes=None,
        agnostic=False,
        multi_label=False,
        labels=(),
        max_det=300,
        nm=0,  # number of masks
):
    """Non-Maximum Suppression (NMS) on inference results to reject overlapping detections
    Returns:
         list of detections, on (n,6) tensor per image [xyxy, conf, cls]
    """
    if isinstance(prediction, (list, tuple)):  # YOLOv5 model in validation model, output = (inference_out, loss_out)
        prediction = prediction[0]  # select only inference output
    device = prediction.device
    mps = 'mps' in device.type  # Apple MPS
    if mps:  # MPS not fully supported yet, convert tensors to CPU before NMS
        prediction = prediction.cpu()
    bs = prediction.shape[0]  # batch size
    nc = prediction.shape[2] - nm - 5  # number of classes
    xc = prediction[..., 4] > conf_thres  # candidates
    # Checks
    assert 0