我会简述如何得到v5模型中各层的参数量和计算量(烂大街的参量表),然后再将如何得到各层的计算量FLOPs(基本没人教怎么获得各层FLOPs,花我一番功夫,其实特别简单,轮子U神都造好了)
文章目录
- 前言
- 一、参数量param和计算量FLOPs
- 二、YOLOV5中打印各项参数
- 1. 烂大街的参数打印
- 2. 各层的计算量FLOPs
- 3.柳暗花明又一村
- 总结
前言
在侧端部署深度学习模型时,我们一直都说说这些模型很小,属于轻量级网络。当他人问如何横向对比这一批轻量级网络时,我们该如何证明这个网络比另一个网络优秀呢?除了mAP外,我们还可以 比对参数量param和计算量FlOPs。
一、参数量param和计算量FLOPs
以yolov5的官方参数表为例:
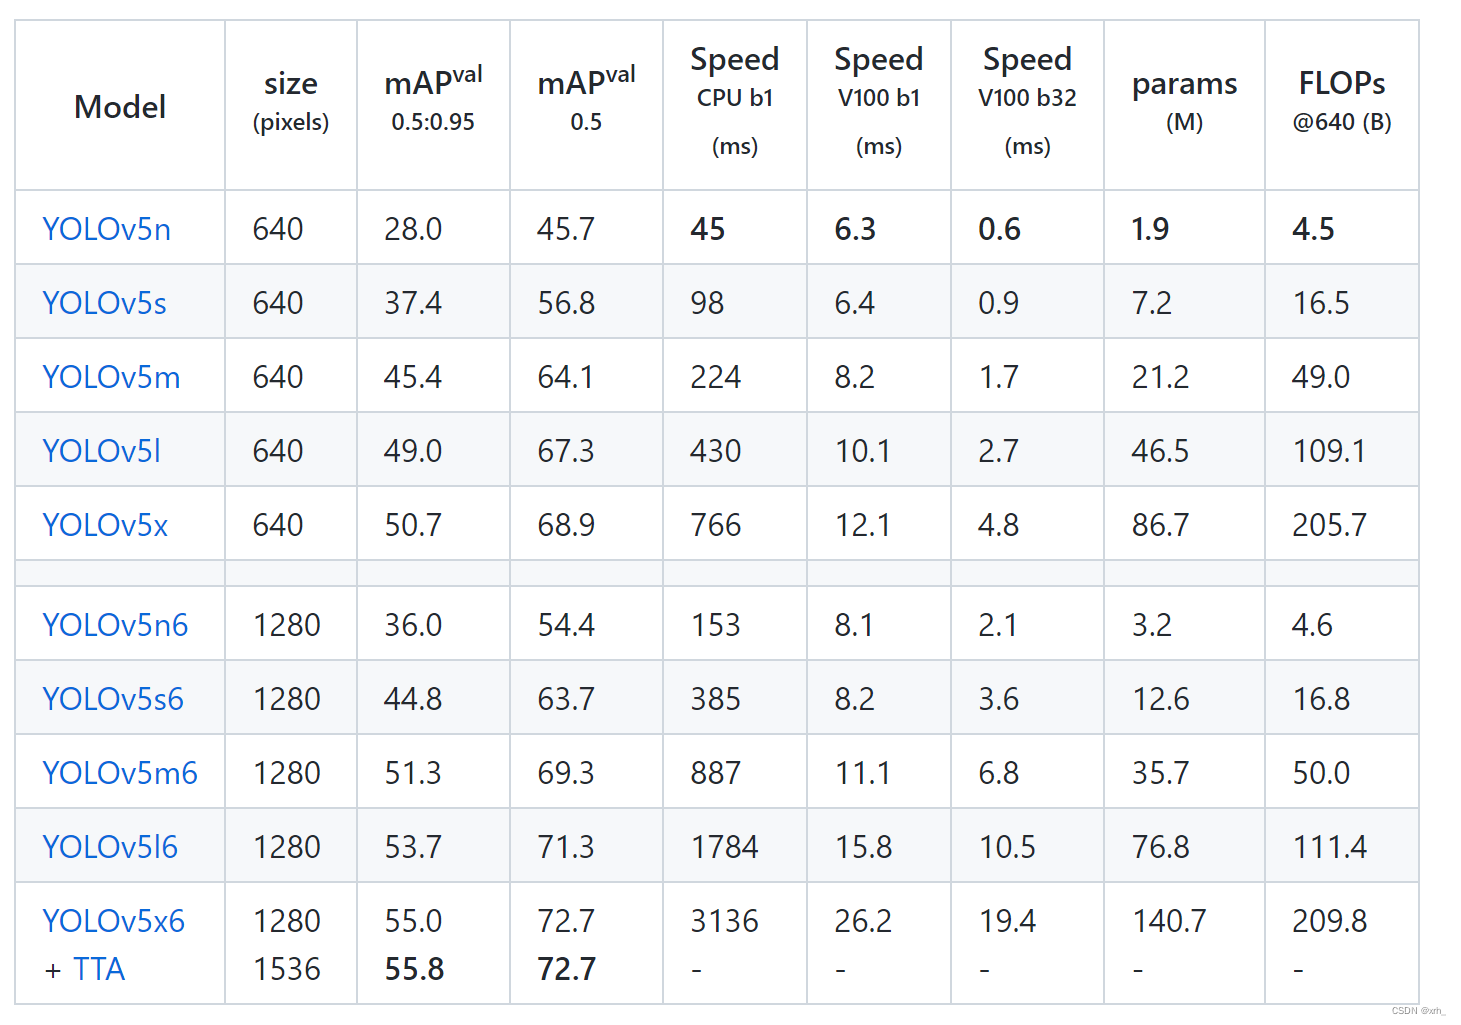
mAP:平均精度指标
params:参数量,单位M:minllion 10^6
FLOPs:模型总计算量 ,单位B/G:billion 10^9
注意:FLOPS为每秒浮点运算次数,常用于描述GPU性能,注意s的大小写
二、YOLOV5中打印各项参数
其实U神在yolov5的工程文件已经写好了打印各项参数的代码,细心的小伙伴也在train或detect时也留意到程序会计算模型信息并打印。
1. 烂大街的参数打印
在 .\yolov5\utils\torch_utilis.py 文件中model_info函数负责打印param和FLOPs信息
def model_info(model, verbose=False, img_size=640):
    #打印模型参数、计算量
    # Model information. img_size may be int or list, i.e. img_size=640 or img_size=[640, 320]
    #train阶段会输出迭代数,等于param
    n_p = sum(x.numel() for x in model.parameters())  # number parameters
    n_g = sum(x.numel() for x in model.parameters() if x.requires_grad)  # number gradients
    if verbose:
    #if True:
        print(f"{'layer':>5} {'name':>40} {'gradient':>9} {'parameters':>12} {'shape':>20} {'mu':>10} {'sigma':>10}")
        for i, (name, p) in enumerate(model.named_parameters()):
            name = name.replace('module_list.', '')
            print('%5g %40s %9s %12g %20s %10.3g %10.3g' %
                  (i, name, p.requires_grad, p.numel(), list(p.shape), p.mean(), p.std()))
    try:  # FLOPs
        # FLOPs 核心计算库 thop.profile
        from thop import profile
        stride = max(int(model.stride.max()), 32) if hasattr(model, 'stride') else 32
        img = torch.zeros((1, model.yaml.get('ch', 3), stride, stride), device=next(model.parameters()).device)  # input
        flops = profile(deepcopy(model), inputs=(img,), verbose=False)[0] / 1E9 * 2  # stride GFLOPs
        img_size = img_size if isinstance(img_size, list) else [img_size, img_size]  # expand if int/float
        fs = ', %.1f GFLOPs' % (flops * img_size[0] / stride * img_size[1] / stride)  # 640x640 GFLOPs
    except (ImportError, Exception):
        fs = ''
    name = Path(model.yaml_file).stem.replace('yolov5', 'YOLOv5') if hasattr(model, 'yaml_file') else 'Model'
    LOGGER.info(f"{name} summary: {len(list(model.modules()))} layers, {n_p} parameters, {n_g} gradients{fs}")
yolo.py会生成一个Model类并调用model_info函数,并结合parse_model函数,我们会得到烂大街的参数表
                 from  n    params  module                                  arguments
  0                -1  1      3520  models.common.Conv                      [3, 32, 6, 2, 2]
  1                -1  1     18560  models.common.Conv                      [32, 64, 3, 2]
  2                -1  1     18816  models.common.C3                        [64, 64, 1]
  3                -1  1     73984  models.common.Conv                      [64, 128, 3, 2]
  4                -1  2    115712  models.common.C3                        [128, 128, 2]
  5                -1  1    295424  models.common.Conv                      [128, 256, 3, 2]
  6                -1  3    625152  models.common.C3                        [256, 256, 3]
  7                -1  1   1180672  models.common.Conv                      [256, 512, 3, 2]
  8                -1  1   1182720  models.common.C3                        [512, 512, 1]
  9                -1  1    656896  models.common.SPPF                      [512, 512, 5]
 10                -1  1    131584  models.common.Conv                      [512, 256, 1, 1]
 11                -1  1         0  torch.nn.modules.upsampling.Upsample    [None, 2, 'nearest']
 12           [-1, 6]  1         0  models.common.Concat                    [1]
 13                -1  1    361984  models.common.C3                        [512, 256, 1, False]
 14                -1  1     33024  models.common.Conv                      [256, 128, 1, 1]
 15                -1  1         0  torch.nn.modules.upsampling.Upsample    [None, 2, 'nearest']
 16           [-1, 4]  1         0  models.common.Concat                    [1]
 17                -1  1     90880  models.common.C3                        [256, 128, 1, False]
 18                -1  1    147712  models.common.Conv                      [128, 128, 3, 2]
 19          [-1, 14]  1         0  models.common.Concat                    [1]
 20                -1  1    296448  models.common.C3                        [256, 256, 1, False]
 21                -1  1    590336  models.common.Conv                      [256, 256, 3, 2]
 22          [-1, 10]  1         0  models.common.Concat                    [1]
 23                -1  1   1182720  models.common.C3                        [512, 512, 1, False]
 24      [17, 20, 23]  1     26970  Detect                                  [5, [[10, 13, 16, 30, 33, 23], [30, 61, 62, 45, 59, 119], [116, 90, 156, 198, 373, 326]], [128, 256, 512]]
YOLOv5s summary: 270 layers, 7033114 parameters, 7033114 gradients, 15.9 GFLOPs
2. 各层的计算量FLOPs
笔者发现FLOPs的核心计算是利用profile库完成的
from thop import profile
flops = profile(deepcopy(model), inputs=(img,), verbose=False)[0] / 1E9 * 2  # stride GFLOPs
当时笔者进一步进入profile.py的底层逻辑中进行修改,想简单的获得各层的计算量或者是计算量的峰值,后续发现其实U神在torch_utilis.py中重构了一个profile函数。
该函数用于输出训练过程中的一些相关信息,如前向传播时间、反向传播时间、输入变量的shape、输出变量的shape等
def profile(input, ops, n=10, device=None): # YOLOv5 speed/memory/FLOPs profiler # # Usage: # input = torch.randn(16, 3, 640, 640) # m1 = lambda x: x * torch.sigmoid(x) # m2 = nn.SiLU() # profile(input, [m1, m2], n=100) # profile over 100 iterations results = [] device = device or select_device() print(f"{'Params':>12s}{'GFLOPs':>12s}{'GPU_mem (GB)':>14s}{'forward (ms)':>14s}{'backward (ms)':>14s}" f"{'input':>24s}{'output':>24s}") for x in input if isinstance(input, list) else [input]: x = x.to(device) x.requires_grad = True for m in ops if isinstance(ops, list) else [ops]: m = m.to(device) if hasattr(m, 'to') else m # device m = m.half() if hasattr(m, 'half') and isinstance(x, torch.Tensor) and x.dtype is torch.float16 else m tf, tb, t = 0, 0, [0, 0, 0] # dt forward, backward try: flops = thop.profile(m, inputs=(x,), verbose=False)[0] / 1E9 * 2 # GFLOPs except Exception: flops = 0 try: for _ in range(n): t[0] = time_sync() y = m(x) t[1] = time_sync() try: _ = (sum(yi.sum() for yi in y) if isinstance(y, list) else y).sum().backward() t[2] = time_sync() except Exception: # no backward method # print(e) # for debug t[2] = float('nan') tf += (t[1] - t[0]) * 1000 / n # ms per op forward tb += (t[2] - t[1]) * 1000 / n # ms per op backward mem = torch.cuda.memory_reserved() / 1E9 if torch.cuda.is_available() else 0 # (GB) s_in = tuple(x.shape) if isinstance(x, torch.Tensor) else 'list' s_out = tuple(y.shape) if isinstance(y, torch.Tensor) else 'list' p = sum(list(x.numel() for x in m.parameters())) if isinstance(m, nn.Module) else 0 # parameters print(f'{p:12}{flops:12.4g}{mem:>14.3f}{tf:14.4g}{tb:14.4g}{str(s_in):>24s}{str(s_out):>24s}') results.append([p, flops, mem, tf, tb, s_in, s_out]) except Exception as e: print(e) results.append(None) torch.cuda.empty_cache() return results当时就想利用这个函数进行修改,嵌入到model_info函数中,达到输出每一层网络的FLOPs的目的,历经尝试失败了。
3.柳暗花明又一村
神奇的发现U神其实都写好了造好轮子的,只是我们不知道哪里去用,怎么用,真的郁闷。
AnyWay,自己琢磨的过程也是学习的过程吧。
yolo.py文件中,U神写好了用法:
if __name__ == '__main__':
    parser = argparse.ArgumentParser()
    parser.add_argument('--cfg', type=str, default='yolov5s.yaml', help='model.yaml')
    parser.add_argument('--batch-size', type=int, default=1, help='total batch size for all GPUs')
    parser.add_argument('--device', default='', help='cuda device, i.e. 0 or 0,1,2,3 or cpu')
    parser.add_argument('--profile', action='store_true', help='profile model speed')
    parser.add_argument('--line-profile', action='store_true', help='profile model speed layer by layer')
    parser.add_argument('--test', action='store_true', help='test all yolo*.yaml')
    opt = parser.parse_args()
    opt.cfg = check_yaml(opt.cfg)  # check YAML
    print_args(vars(opt))
    device = select_device(opt.device)
    # Create model
    im = torch.rand(opt.batch_size, 3, 640, 640).to(device)
    model = Model(opt.cfg).to(device)
    # Options
    if opt.line_profile:  # profile layer by layer
        _ = model(im, profile=True)
    elif opt.profile:  # profile forward-backward
        results = profile(input=im, ops=[model], n=3)
    elif opt.test:  # test all models
        for cfg in Path(ROOT / 'models').rglob('yolo*.yaml'):
            try:
                _ = Model(cfg)
            except Exception as e:
                print(f'Error in {cfg}: {e}')
parser.add_argument('--profile', action='store_true', help='profile model speed') parser.add_argument('--line-profile', action='store_true', help='profile model speed layer by layer') #其实这里就明明白白写着怎么输出各层FLOPs稍微修改代码,然后
终端行输入python .\models\yolo.py --line-profile我们得到:
 time (ms)     GFLOPs     params  module
     22.01       0.72       3520  models.common.Conv
     16.48       0.95      18560  models.common.Conv
     41.61       0.96      18816  models.common.C3
     10.80       0.95      73984  models.common.Conv
     33.24       1.48     115712  models.common.C3
      8.00       0.95     295424  models.common.Conv
     26.01       2.00     625152  models.common.C3
      6.80       0.94    1180672  models.common.Conv
     10.16       0.95    1182720  models.common.C3
     11.60       0.53     656896  models.common.SPPF
      1.20       0.11     131584  models.common.Conv
      0.40       0.00          0  torch.nn.modules.upsampling.Upsample
      0.40       0.00          0  models.common.Concat
     16.00       1.16     361984  models.common.C3
      1.60       0.11      33024  models.common.Conv
      0.80       0.00          0  torch.nn.modules.upsampling.Upsample
      1.20       0.00          0  models.common.Concat
     26.04       1.16      90880  models.common.C3
      4.00       0.47     147712  models.common.Conv
      0.40       0.00          0  models.common.Concat
     14.44       0.95     296448  models.common.C3
      4.09       0.47     590336  models.common.Conv
      0.00       0.00          0  models.common.Concat
     10.40       0.95    1182720  models.common.C3
      2.80       0.09      26970  Detect
    270.49      15.88 7033114.00  Total
得到完整的各层参量和FLOPs表,简洁多了
如果你看到这里,我希望你研究下profile函数,这个函数可移植性高,可以适用大部分模型。
总结
最初我是想自己调用U神写的profile函数,发现真的好难实现,输入比较难写,后续也发现了U神在yolo.py留下的彩蛋。
其实获取各层的计算量很简单,一行代码就可以了,但为什么网上基本就没有资料没人记录呢,哪怕用来指导后来人也很好啊,这个profile函数其实可以使用于大部分模型,可移植。
我就边絮絮叨叨记录踩坑过程,希望后来人不用踩坑吧,毕竟大部分都是像我这样的萌新。虽然后面是用了U神的代码,但前期自己琢磨的过程也很有收获,笑