文章目录
- 前言
- 1.Yolo简介
- 2.onnxruntime简介
- 3.Yolov5模型训练及转换
- 4.利用cmake向C++部署该onnx模型
- 总结
前言
接到一个项目,需要用c++和单片机通信,还要使用yolo模型来做到目标检测的任务,但目前网上的各种博客并没有完整的流程教程,让我在部署过程费了不少劲,也踩了不少坑(甚至一度把ubuntu干黑屏)。于是想把训练及部署过程记录下来,并留给后来者方便使用。(博主使用的系统是ubuntu20.04)
1.Yolo简介
作为一个经典且实用的目标检测模型,yolo的性能强大已无需多言,现在(2023.4.1)yolo模型已经推出到yolov8,但是推理速度上yolov5还是够快且够用,而且对各种外部硬件的适配性强,如oak相机支持的模型还在yolov5-yolov6,所以博主这里选择yolov5进行训练。
2.onnxruntime简介
onnxruntime是微软推出的一款推理框架,我们可以很方便的利用它运行一个onnx模型,而且它支持多种运行后端,包括CPU,GPU,TensorRT,DML等。onnxruntime可以说是对onnx模型最原生的支持了,而且onnxruntime也有在C++上部署使用的相关库,所以我们选择onnxruntime作为我们的推理框架进行部署。
3.Yolov5模型训练及转换
怎么训练呢?
对于yolov5模型的训练,其实选择哪个都可以,博主这里模型使用的是https://github.com/ultralytics/yolov5/tree/v5.0
- 训练过程参考这个链接
这个博主对训练过程提供了非常详细的说明。按照这个博主的教程可以得到训练后的.pt文件,先别急着在models里export转换模型。如果在这里转换之后得到的output可能是这样的。
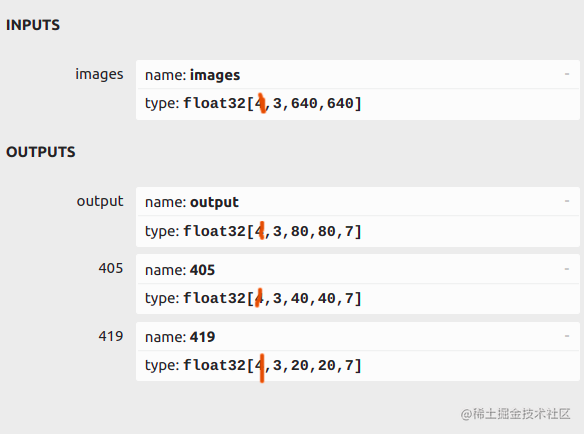
可以看到这个图片中有三个output,这样的结果是不能用的,我们需要的output是类似于[1,25200,7]这样的结果,并且这个结果必须在第一位上,通过观察可以知道25200是上图中三个输出结果中三个先验框大小和数量相乘得到的而我们训练使用的yolov5模型export的转换结果却不是这样的总和。
那怎么转换呢?
很简单,通过观察yolov5中yolo部分的代码发现

这个代码中的return是有问题的,返回结果不是我们想要的存在类似与[1,25200,7]的结果,而是详细细分的。这里我们最好不要改动yolo部分的代码,这可能会牵连其他部分从而产生错误。我们直接使用https://github.com/ultralytics/yolov5 这个模型来进行转换
- 首先先下载这个模型,用vscode打开后找到export.py
在vscode的终端中输入
python export.py --weights yolov5s.pt --include torchscript onnx openvino engine coreml tflite ...
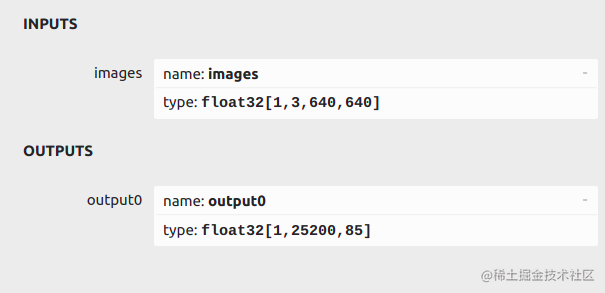
注意yolov5s.pt处填自己训练结果的pt文件地址。然后我们使用netron查看得到的onnx模型
-
惊奇的发现我们得到了我们想要的output!(win!)(注意最后的85只是80个labels和5个参数,自己训练的模型有自己设置的labels所以数量可能不一样)
-
到这里我们已经完成了yolov5模型的训练和转换,请带好自己的随身物品(onnx模型),我们要赶往下一站了
4.利用cmake向C++部署该onnx模型
- 在这一步我们可能会遇到很多难题,但是不要着急,我来带着你一步步走
1.下载onnxruntime-gpu版本
- 博主这里使用的是onnxruntime-gpu-1.7
- 这里选择onnxruntime-linux-x64-gpu-1.7.0.tgz
- 下载后解压,然后放在主目录里,我们可以看到打开文件后有include和lib两个文件夹。这个我们之后要在cmakelist里链接。
2.下载vscode并创建cmake工程
- 这是博主的main函数代码,里面包含了onnxruntime的使用和推理结果的处理
#pragma comment(lib, "k4a.lib")
#include
#include
#include
#include
#include
#include
#include
#include
#include
#include
#include
#include
#include
#include
#include
#include "opencv2/imgproc/imgproc_c.h"
#include
//onnxruntime
// #include
// #include
// #include
// #include
#include
#include
#include
// 命名空间
using namespace std;
using namespace cv;
using namespace Ort;
// 自定义配置结构
struct Configuration
{
	public:
	float confThreshold; // Confidence threshold置信度阈值
	float nmsThreshold;  // Non-maximum suppression threshold非最大抑制阈值
	float objThreshold;  //Object Confidence threshold对象置信度阈值
	string modelpath;
};
// 定义BoxInfo结构类型
typedef struct BoxInfo
{
	float x1;
	float y1;
	float x2;
	float y2;
	float score;
	int label;
} BoxInfo;
// int endsWith(string s, string sub) {
// 	return s.rfind(sub) == (s.length() - sub.length()) ? 1 : 0;
// }
// const float anchors_640[3][6] = { {10.0,  13.0, 16.0,  30.0,  33.0,  23.0},
// 								 {30.0,  61.0, 62.0,  45.0,  59.0,  119.0},
// 								 {116.0, 90.0, 156.0, 198.0, 373.0, 326.0} };
// const float anchors_1280[4][6] = { {19, 27, 44, 40, 38, 94},{96, 68, 86, 152, 180, 137},{140, 301, 303, 264, 238, 542},
// 					   {436, 615, 739, 380, 925, 792} };
class YOLOv5
{
public:
	YOLOv5(Configuration config);
	void detect(Mat& frame);
private:
	float confThreshold;
	float nmsThreshold;
	float objThreshold;
	int inpWidth;
	int inpHeight;
	int nout;
	int num_proposal;
	int num_classes;
	string classes[1] = {"tower"};
// string classes[80] = {"person", "bicycle", "car", "motorbike", "aeroplane", "bus",
// 							"train", "truck", "boat", "traffic light", "fire hydrant",
// 							"stop sign", "parking meter", "bench", "bird", "cat", "dog",
// 							"horse", "sheep", "cow", "elephant", "bear", "zebra", "giraffe",
// 							"backpack", "umbrella", "handbag", "tie", "suitcase", "frisbee",
// 							"skis", "snowboard", "sports ball", "kite", "baseball bat",
// 							"baseball glove", "skateboard", "surfboard", "tennis racket",
// 							"bottle", "wine glass", "cup", "fork", "knife", "spoon", "bowl",
// 							"banana", "apple", "sandwich", "orange", "broccoli", "carrot",
// 							"hot dog", "pizza", "donut", "cake", "chair", "sofa", "pottedplant",
// 							"bed", "diningtable", "toilet", "tvmonitor", "laptop", "mouse",
// 							"remote", "keyboard", "cell phone", "microwave", "oven", "toaster",
// 							"sink", "refrigerator", "book", "clock", "vase", "scissors",
// 							"teddy bear", "hair drier", "toothbrush"};
	const bool keep_ratio = true;
	vector input_image_;		// 输入图片
	void normalize_(Mat img);		// 归一化函数
	void nms(vector& input_boxes);
	Mat resize_image(Mat srcimg, int *newh, int *neww, int *top, int *left);
	Env env = Env(ORT_LOGGING_LEVEL_ERROR, "yolov5-6.1"); // 初始化环境
	Session *ort_session = nullptr;    // 初始化Session指针选项
	SessionOptions sessionOptions = SessionOptions();  //初始化Session对象
	//SessionOptions sessionOptions;
	vector input_names;  // 定义一个字符指针vector
	vector output_names; // 定义一个字符指针vector
	vector input_node_dims; // >=1 outputs  ,二维vector
	vector output_node_dims; // >=1 outputs ,int64_t C/C++标准
};
YOLOv5::YOLOv5(Configuration config)
{
	this->confThreshold = config.confThreshold;
	this->nmsThreshold = config.nmsThreshold;
	this->objThreshold = config.objThreshold;
	this->num_classes = 1;//sizeof(this->classes)/sizeof(this->classes[0]);  // 类别数量
	this->inpHeight = 640;
	this->inpWidth = 640;

	string model_path = config.modelpath;
	//std::wstring widestr = std::wstring(model_path.begin(), model_path.end());  //用于UTF-16编码的字符
	//gpu, https://blog.csdn.net/weixin_44684139/article/details/123504222
	//CUDA加速开启
    //OrtSessionOptionsAppendExecutionProvider_Tensorrt(sessionOptions, 0);
    OrtSessionOptionsAppendExecutionProvider_CUDA(sessionOptions, 0);
	sessionOptions.SetGraphOptimizationLevel(ORT_ENABLE_BASIC);  //设置图优化类型
	//ort_session = new Session(env, widestr.c_str(), sessionOptions);  // 创建会话,把模型加载到内存中
	//ort_session = new Session(env, (const ORTCHAR_T*)model_path.c_str(), sessionOptions); // 创建会话,把模型加载到内存中
	ort_session = new Session(env, (const char*)model_path.c_str(), sessionOptions);
	size_t numInputNodes = ort_session->GetInputCount();  //输入输出节点数量
	size_t numOutputNodes = ort_session->GetOutputCount();
	AllocatorWithDefaultOptions allocator;   // 配置输入输出节点内存
	for (int i = 0; i GetInputName(i, allocator));		// 内存
		Ort::TypeInfo input_type_info = ort_session->GetInputTypeInfo(i);   // 类型
		auto input_tensor_info = input_type_info.GetTensorTypeAndShapeInfo();  //
		auto input_dims = input_tensor_info.GetShape();    // 输入shape
		input_node_dims.push_back(input_dims);	// 保存
	}
	for (int i = 0; i GetOutputName(i, allocator));
		Ort::TypeInfo output_type_info = ort_session->GetOutputTypeInfo(i);
		auto output_tensor_info = output_type_info.GetTensorTypeAndShapeInfo();
		auto output_dims = output_tensor_info.GetShape();
		output_node_dims.push_back(output_dims);
	}
	this->inpHeight = input_node_dims[0][2];
	this->inpWidth = input_node_dims[0][3];
	this->nout = output_node_dims[0][2];      // 5+classes
	this->num_proposal = output_node_dims[0][1];  // pre_box
}
Mat YOLOv5::resize_image(Mat srcimg, int *newh, int *neww, int *top, int *left)  //修改图片大小并填充边界防止失真
{
	int srch = srcimg.rows, srcw = srcimg.cols;
	*newh = this->inpHeight;
	*neww = this->inpWidth;
	Mat dstimg;
	if (this->keep_ratio && srch != srcw) {
		float hw_scale = (float)srch / srcw;
		if (hw_scale > 1) {
			*newh = this->inpHeight;
			*neww = int(this->inpWidth / hw_scale);
			resize(srcimg, dstimg, Size(*neww, *newh), INTER_AREA);
			*left = int((this->inpWidth - *neww) * 0.5);
			copyMakeBorder(dstimg, dstimg, 0, 0, *left, this->inpWidth - *neww - *left, BORDER_CONSTANT, 114);
		}
		else {
			*newh = (int)this->inpHeight * hw_scale;
			*neww = this->inpWidth;
			resize(srcimg, dstimg, Size(*neww, *newh), INTER_AREA);  //等比例缩小,防止失真
			*top = (int)(this->inpHeight - *newh) * 0.5;  //上部缺失部分
			copyMakeBorder(dstimg, dstimg, *top, this->inpHeight - *newh - *top, 0, 0, BORDER_CONSTANT, 114); //上部填补top大小,下部填补剩余部分,左右不填补
		}
	}
	else {
		resize(srcimg, dstimg, Size(*neww, *newh), INTER_AREA);
	}
	return dstimg;
}
void YOLOv5::normalize_(Mat img)  //归一化
{
	//    img.convertTo(img, CV_32F);
    //coutnormalize_(dstimg);       //归一化
	// 定义一个输入矩阵,int64_t是下面作为输入参数时的类型
	array input_shape_{ 1, 3, this->inpHeight, this->inpWidth };  //1,3,640,640
    //创建输入tensor
    /*
    这一行代码的作用是创建一个指向CPU内存的分配器信息对象(AllocatorInfo),用于在运行时分配和释放CPU内存。
    它调用了CreateCpu函数并传递两个参数:OrtDeviceAllocator和OrtMemTypeCPU。
    其中,OrtDeviceAllocator表示使用默认的设备分配器,OrtMemTypeCPU表示在CPU上分配内存。
    通过这个对象,我们可以在运行时为张量分配内存,并且可以保证这些内存在计算完成后被正确地释放,避免内存泄漏的问题。
    */
	auto allocator_info = MemoryInfo::CreateCpu(OrtDeviceAllocator, OrtMemTypeCPU);
    //使用Ort库创建一个输入张量,其中包含了需要进行目标检测的图像数据。
	Value input_tensor_ = Value::CreateTensor(allocator_info, input_image_.data(), input_image_.size(), input_shape_.data(), input_shape_.size());
	// 开始推理
	vector ort_outputs = ort_session->Run(RunOptions{ nullptr }, &input_names[0], &input_tensor_, 1, output_names.data(), output_names.size());   // 开始推理
	/generate proposals
    //coutCMAKE_CURRENT_LIST_DIR} ) # 包含当前目录下我的头文件
include_directories( ${OpenCV_INCLUDE_DIRS} )
include_directories(include)
# Enable C++11
set(CMAKE_CXX_FLAGS "-std=c++11")
set(CMAKE_CXX_STANDARD 11)
set(CMAKE_CUDA_STANDARD 11)
set(CMAKE_CXX_STANDARD_REQUIRED TRUE)

set(ONNXRUNTIME_INCLUDE_DIRS your_include)
set(ONNXRUNTIME_LIBS your_libonnxruntime.so)
include_directories(${ONNXRUNTIME_INCLUDE_DIRS})
# Link your application with other libraries
add_executable(${PROJECT_NAME} "main.cpp")
target_include_directories(${PROJECT_NAME} PUBLIC ${ONNXRUNTIME_INCLUDE_DIRS})
target_link_libraries(onnxrun1 ${CUDA_LIBRARIES})
target_link_libraries(${PROJECT_NAME} k4a::k4a ${ONNXRUNTIME_LIBS} ${OpenCV_LIBS})
- 这是博主的main函数代码,里面包含了onnxruntime的使用和推理结果的处理
- 博主这里使用的是onnxruntime-gpu-1.7
- 在这一步我们可能会遇到很多难题,但是不要着急,我来带着你一步步走
-
- 首先先下载这个模型,用vscode打开后找到export.py
- 训练过程参考这个链接